White Collar Handyman
In-Home and In-Office Technology Concierge Services
Lessons & Tutoring • Repair • Troubleshooting • Upgrades & Installation
Fast Response • Reasonable Rates • In Your Home or Office • Same Day Service Available
(781) 989-2373
Hey! We've moved to a new URL to better reflect who we are and what we do! Please visit Rob Falk Technology Concierge Services at http://robfalk.net and update your bookmarks.

Wednesday, March 20, 2013

Silent Mac?

Are you no longer hearing a new mail alert?

Has your trash sound, delete sound, copy complete sound or other "user interface audio" disappeared?

Do your sound preferences seem to be OK?

Before you restart your system, try this:

  1. Open "Activity Monitor" which is in your "Utilities" folder inside your "Applications" folder 
  2. Search for "coreaudiod"
  3. Once found, click on it so that it is highlighted.
  4. Now, click on "Quit Process" in the upper left part of the window. 
  5. Click on "Quit" in the resulting dialog
VoilĂ !*


*Pet Peeve Alert: Why do people write and say "Walla!" at the end of some kind of revelatory statement? Are they being funny and I just don't get it, or do they have no idea that the word is "VoilĂ " and that the "v" is not silent?

Wednesday, March 6, 2013

Trouble viewing PDFs in Firefox?

Last week's hint on resolving Safari's issues with PDF's evoked an outcry from some frustrated Firefox users who were also having problems seeing PDFs in their browser.

Here's one way to overcome Firefox's reluctance to properly display PDFs.
  1. In Firefox, type ⇧⌘A or choose "Add-ons" from the "Tools" Menu
  2. Once that page loads, clcik "Get Add-ons" on the left side of the page.
  3. "Extensions" Tab
  4. Next, type "PDF Viewer" in the search box in the upper right part of the window.
  5. Once "PDF Viewer" appears, click on it, and then click on the "Add To Firefox" button.
  6. When the pop-down window appears, wait a few seconds and then click "Install Now."
  7. Click on the "Extensions" tab on the left side of the page.
  8. Look to see if you if you have an Adobe Acrobat plug-in. If you do, click "Disable."
  9. Quit and restart Firefox.
Navigate to a page with a PDF, and you should be able to see it now. If you can't see the PDF, please let me know what Mac you're using, what version of Safari & Mac OS, and I'll see if I have any other ideas for you!

Monday, February 18, 2013

Can't Open PDF in Safari? Try this.

Some Mac users are frustrated by an inability to open and read PDF files in their Safari browser. Here's what I did to solve that problem for myself a few weeks ago:
  1. Quit Safari
  2. Go to Finder Type ⇧⌘-G (Command-Shift-G) or choose "Goto Folder…" from the "Go" menu.
  3. Type "/Library/Internet Plug-Ins" (without the quotation marks!)
  4. When that folder opens, look for a plug-in called "AdobePDFViewerNPAPI.plugin"
  5. If you find it, drag it to the desktop. Restart Safari and go to a page with a PDF.
If you can see this PDF now, you can safely throw away AdobePDFViewerNPAPI.plugin.

If you can't see the PDF, please let me know what Mac you're using, what version of Safari & Mac OS, and I'll see if I have any other ideas for you!

Friday, February 1, 2013

Encrypt Your Portable Drives for Security and Peace of Mind

I hope you aren't walking around with all your important stuff or backups on an unencrypted thumb drive or portable hard drive!

You have a password on your computer, right? That's good, but what about that tiny little key fob sized flash drive that you use to bring stuff back and forth from work to home? What if you dropped that tiny little thing somewhere? What's to keep people from picking it up, popping it in their computer and looking through all of what have you?

The answer is "encryption." Be sure that your portable drives and flash memory sticks are encrypted. On a Mac it's very, very easy. Take your flashy new flash drive, plug it in to the USB port and start "Disk Utility."

Find the drive in the left part of the utility window and click on it.

Click on the "Erase" tab near the top of the window.

Click on the "Format" pop-up list in the center portion of the window and choose "Mac OS Extended, Journaled, Encrypted," and then click "Erase…"

Enter a good password in the window that pops up. (One that you can remember but one that is not easily guessed. I've posted some other entries on the necessity of having good passwords here.) Now, click on "Erase."

When Disk Utility is done, you'll have a secure thumb drive. One that will refuse to mount on any computer unless the password is entered. You can,  and should, do the same with portable hard drives.

On many levels, Identity Theft is the result of data breaches at large corporations, computer web sites, and governmental databases and there is little we can do on an individual basis. But, this is one little step that you can take to secure your own data, prevent data theft and data loss. It contributes much more to your cyber well being than continually worrying about large scale identity theft.

Wednesday, January 23, 2013

How Do I Type That ¶ or ∓ Thingie?

Every once in a while, you need to type a special symbol like § or ¶ or •

Maybe you remember that § is entered by typing Option-6, that ¶ is Option-7, and • is Option-8. Maybe you remember telephone numbers, too. I used to. I don't anymore. I don't know whether it's age, or disuse... I'm hoping the latter. In fact, because I need to use them frequently, I do know ¶ and •, but § took me a little while today, and that's why I want to (re)introduce Mac users to the "Character and Keyboard Viewer."

Language and Text Preferences
Open your System Preferences (Black Apple Menu, Upper left) and choose "Language and Text" from the top row.

Check the box next to "Keyboard & Character Viewer," and at the bottom of the window, check the box for "Show Input in menu bar.

Now, any time you need a special character, or even an emoticon, God forbid, you'll have it at your finger tips.

Character Viewer
When you click on the new icon in your menu bar, you'll be able to choose between the "Keyboard Viewer" and the "Character Viewer."

Open the Character Viewer and you can browse through all the different special characters that are available to you. When you see the one you like, just double click on it, and it will be inserted in your open document.

Keyboard Viewer
If you care to learn how to type it yourself next time, open the Keyboard Viewer. As you hold down the Option, Command, Control and Shift keys, the keyboard on screen will change to show you the characters that can be typed by those key combinations.

(Note: Emoticons probably won't "travel" well. In other words, although you may use them in print documents, chances are they will not show up properly in emails or messages if you are sending them to people in the non-Mac or iDevice world).

Saturday, September 22, 2012

Lost ...and Found

A news story today caught my eye, and made me smile

A man accidentally forgot his iPad on an airline flight. An honest and helpful departing passenger found it, and brought it to the less honest flight attendant, who took his iPad to her home and promptly made it her iPad. But the man who lost the iPad used the built-in "Find My iPad" option to zero in on it's location. He called the cops in her hometown, they went to the address he gave them, grabbed the iPad and arrested the crook. [Full story here]


Did you know that every modern Mac, iPhone, iPad and iPod has the built-in ability to be found? It's easy to take advantage of these features, but there are a few things you do need to do before the need to find your device arises:

1. You need an Apple ID. If you set up iCloud already, you have one. If you haven't set up your free iCloud account already, what are you waiting for? It has so many great uses besides finding your iDevices that there's no reason not to set it up.

2. You need to activate it on your device - in advance - if you want to be able to use it. On your iDevice, go into Settings>iCloud, and scroll down to Find my i[Device]. Make sure it's "On."

3. Download and configure the free "Find My iPhone" App from iTunes.

4. Know your iCloud username and password. This means that although you need to use a secure password, you also need to be able to absolutely positively remember this one.

Then, in the event that your Mac or iPhone is lost or misplaced, you can either use the app on one of your other devices, or a friend's device, or get on the web and log in to iCloud and activate "Find My iPhone."

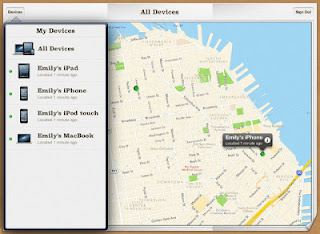
A map will open up, and - if it can - the app will pinpoint the location of all your stuff! You also have the option to make the lost device beep loudly (very useful when you don't know where your phone is but you know it's around here somewhere), lock it and pop up a message ("Hey, If you found my phone, please call me at this number...) or erase it (This is the "nuclear option:" a last ditch effort to avoid having all your private stuff become someone else's. After you erase the information on an iOS device, you won’t be able to use Find My iPhone to locate it or play a sound.)

If you are running iOS 6, you'll even be able to track your device, keeping a log of all the places your phone goes until you can get it back.

So, download the app and play around with it, and visit iCloud and try it there as well.

If you need help, you know where to find me!

Thursday, September 6, 2012

UDID what?

A hacker group known as AntiSec claims to have hacked into an FBI agent's laptop and downloaded a database containing 12,000,000 UDID's along with other personal information attached to those IDs.

A UDID is the Unique Device Identifier for your Apple iOS device (iPhone, iPad, iPod Touch.) It's kind of like DNA trace, only digital. And just like DNA trace, if someone has merely that alone, it doesn't do them much good. But if that UDID gets into a database (like CODIS, perhaps?) with your name, and other personal data, it becomes a very powerful tool for identity theft, or privacy invasion. And AntiSec says the FBI and other entities are working on just such a database. Some may find that troubling. (The rest are brain-dead.)

While the FBI has denied that it was the source of the leak, it hasn't actually denied having the information.

There's a more detailed explanation of the whole thing available at TechCrunch.

And, there's a good way to find out if your UDID is one of the million published. Here's how:

  1. Plug your iDevice into iTunes.
  2. Click on your iDevice in the Devices part of the window.
  3. Click Summary in the Main window.
  4. Click on the Serial Number area. It changes to your UDID.
  5. Make note of that string of characters
  6. Browse to LastPass.com
  7. Just enter the first 5 of those characters and see if it thinks you've been leaked.

If it comes back with your whole number, it's been leaked. Otherwise, you're not one of the million, but there are 11 million more where those came from. :-(

This is a good reminder to make sure that you have taken all the security measures you can with regard to your iDevices, your computer, and all your various Internet accounts like Facebook, Twitter, Amazon, your bank and credit cards, and all those other places that really only have a few keystrokes between the bad guys and all of your stuff.

If you are still using the same user name and password at more than one site...
If you are still using passwords like fluffy1994...
If you are not already using 1Password or LastPass or some thing like them...

Now is the time to take a security inventory and step up your guard. I'm here to help if you need me.

For now, whether your UDID has been leaked or not, there's not much more to do. Except maybe join the EFF.